

Download Now

SuperERP User Manual :
==========
Full User Manual is Below!
* SuperERP FRAMEWORK *

Download Software from our Website (Installation Guide Video):

*Disclaimer : Product actual Current image & Image posted here may differ because of continuous Product Upgrade Process going on, still you will find these data very much helpful to learn & operate Brain Software Easily. Thanks.
* Software Start Page *

~ Once Finishes Setup it will place "SuperERP" Icon on Desktop
~ Double Click on "SuperERP" Icon
~ Software Welcome Screen will open
~ Press Continue Button to Start Software

~ "Create A New Company"
~ Pressing this Button will open a new Screen
~ Fill up all necessary data required

~ Type your Firm Name & Address
~ Select State from List Available then Press Enter
~ This will pop up State Code Automatically according to GST India
~ Select Proper Financial Period from 1st April to 31st March
~ Type Service Provider Details & Partner Code as Shown in Image
~ Leave the Space Blank which you want to..
~ Press "Create Company" Button
~ This will Give you dash Board with Company Selection

~ Double Click on your Company & Start the Software.
~ There are few Important tool shortcuts in footer area
~ F3 : Create A New Company
~ F4 : "Set Database Path Manually" Please set the "SuperERP" Folder "Data" Sub folder into this path, By Default software will install in "D Drive" but if not available D Drive on your Hard Disk than You have to give Manual database path from here where the SuperERP is Installed.
:-> Even you can Select Auto Back up Folder as desired from same Screen Setup.
~ F5 : Backup My Data - By Default SuperERP will take backup When software is Closed & store it into Backup folder of Mother Folder SuperERP. Still You can take Manual Backup and give the Path your External HDD or Pen Drive or somewhere on Cloud from here.
~ F6 : Restore My Data - You can Restore your Back up data with this if current data is lost or corrupted in any case.
~ F8 : Change Financial Year - Used to Close Database of Current Financial year on 31st of March
~ Other Settings : Select GST Return Type of your Firm Here.
~ Now Proceed towards software Login Screen

~ Use your Login ID & Password for Enter into SuperERP Software
~ Default User ID & Password is "1"
~ You can change User ID & Password while creating a New Company
~ You can Edit Password after login into Software from User Master
~ You can create a New User ID from Same Master
~ Press Login Button to Enter into SuperERP Software

* SuperERP Dashboard *
~ Left Top Panel : Main Menu of SuperERP Software
~ Right Panel : Quick Access Menu of Frequently Used Screens, You can Just Single Click on any Button here or use Shortcut Keys to open specific Screen of SuperERP Software.
~ Left Panel : Support System :
1. Website Icon : will lead you to our Brand Website
2. Contact Us :
3. Live Chat : will lead you to What's App Web portal : Where you can Directly Chat with us & get help online anytime during office hours.
4. Feedback : Rate us if you like our product & services
5. Social Medial : Reach Our Social Medial Handle
* Common Instructions *
> "+" Plus Sign beside any Combo Box will Open a New Master
> "-" Minus Sign Beside any Master Combo Data Selection Box will Edit the data
> "_" Under Score Sign in any Button will Execute that Button with "Alt" Key on Keyboard.
Ex. If "Close" Button to Execute Press "Alt & C" Key on Keyboard to gather. This works anywhere in software and other Windows based software's.
*Let's Start Our Software Operations Now *
* SuperERP FRAMEWORK *
=====
*Let's Start with Master Framework Training*
* MASTER FRAMEWORK SuperERP *

@ Masters Available in SuperERP Software
(- List Of State - City - Area Master)
==========
# Account Master #

~ Account Name : Name of Customer, Supplier, Bank or any lager
~ Print Name : By pressing Enter key in Account Name same data will be copied here
Group : Select the Group of your Account Leger Created. Ex. Select Customers, Suppliers, Direct Expense, Income, Bank Etc., as per the Account Need. You can Create New Account Group by pressing Plus Button Beside or Edit Existing one by pressing Pen Button.
~ Op. Bal. : Opening Balance of Leger Created
~ Dr. / Cr. : If you have any figure in Opening Balance Box then Choose weather that amount should show as Debit or Credit in that account while generating lager of that account.
~ Address : Type Address of your Customer / Supplier.
~ Address 2 : if you have more lines in customer address then use this 2nd line. Avoid typing more data in to single line, rather split into two lines.
~ City : Type the name of city will directly insert the State Name automatically. If you are entering the City Name first time then it will pop up a window to select the state associated with that city.
~ Area : Select area from available list, or create a new one.
~ Pin code : City Pin code
~ State : Select the State Name from available list & press Enter key after that will pick up state code (As per GST Guidelines) automatically
~ State Code : State codes are defined for every state of India as per GST Regime, this code will decide weather your Invoice is Interstate IGST or Intra State CGST & SGST.
~ Phone : Phone Number of Customer / Supplier
~ Mobile : Mobile Number of Customer / Supplier. This Number software will send auto SMS when Sales / Purchase / Receipt / Payment is made & configured API in Software. Don't Use any + or 91 country come here. Just type 10 Digit Mobile number, in case of multiple numbers, just Use "," Comma Separator between multiple numbers.
~ Contact Person : Type the name of Contact person of Account or Company for reference.
~ Email : Email ID of Customer / Supplier
~ Birthday On : Type the Birth Date in DD-MM-YYYY Format.
~ Anniversary : Type the Anniversary Date in DD-MM-YYYY Format.
~ Bank Account No. : Type the Customer / Supplier Bank Account No. here, Make a note here that it is just for reference & no connectivity with real bank Transactions.
~ Bank Name : Name of Bank (just for reference)
~ IFSC Code : Indian Financial System Code (or more commonly known as IFSC code) is an 11-digit alpha-numeric code used to uniquely identify bank branches within the National Electronic Funds Transfer (NEFT) network by central bank
~ Branch : Branch Name of Particular Bank Account
~ Cheque Printing Name : If you have different Name than Account Name to print Cheque than please type it here or leave the blank if the same name of account is to be printed on cheque.
Our Software can Print Cheque of Supplier Payment with all details & entry made from Quick Payment Transaction Screen. Please click on video link to see how does it works....

~ GST No. : Type Customer / Supplier GSTIN here (15 Characters)
You can Verify this by icon beside this Box. "Verify"
~ Adhar Card No. : Not Required Field for accounting purpose
~ Party Type : will pop up automatically, Major Four Party Types are available in GST Regime of India. 1.GST Dealer (B2B Invoices if GSTIN available)
2. Un-Registered Person (B2C Invoices if GSTIN Not Available)
3. Composition Dealer (Select if Required)
4. UIN Holder : Unique Identification Holder
~ VAT No. : Value Added Tax Number (Was in Sales Tax Before July-2017)
~ U. Card No. : Unique Card No - Used to map specific Alpha numeric Code Number of Customer or Supplier. This will help search customer / supplier while billing.
~ PAN Card : Customer PAN Card Number
~ CST No. : Central Sales Tax No. (Used Before July 2017 Billing in India)
~ DL No. 1 : Drug License Number of Customer~ DL No. 2 : 2nd Drug License Number of Customer
~ Maintain Bill-by-bill Balance : Needs to be checked this Option if you want specific Customer or Supplier Lager to maintain Bill by Bill Payment or Receipts. Software will ask to settle pending invoices with date and amount reference while making payment
~ Credit Limit : Set Customer Credit Limit Here & control over limit invoicing of credits by making customized settings in Options
~ Credit Days for Sale : Credit Days setting will pop up due date of specific invoice while making sale or purchase entry. after that that software report will show the invoice already due for payment.
~ Bill Limit : Set Supplier Credit Limit here works with purchase screen.
~ Credit Days for Purchase : Credit Days of Supplier will remind us to pay our supplier in time and report will show how many bills has crossed their due date.
~ Audit up to : Set the date or interval here for auditing the lager. Generally used for those lagers who have more transactions daily. Needs to be cross checked regularly.
~ Measurement : Select units of Measurement for specific requirement, leave it blank if not required.
~ TCS Applicable : Check this Box ON to avail "Tax Collected at Source" _New Tax in GST Regime of India started in 2020 Year.
~ Price to Apply : Select the Item Price to apply for specific Customer while making sales Invoice. This automates the Billing process, Generally very useful in Wholesale type of Business Structures where we need to give different prices of same product to different customers.
~ Save : Press Save Button to Save the Details
~ List of accounts : will show you list, where you can filter the details, Import & Export from Excel.
~ Delete : Delete the specific selected lager. Software will allow deleting the lager only if you haven't made any transactions with that lager.
~ Close : Close or "Esc" Button will close the Account Entry Screen.
=====
:: Get Auto Details of Customer with only GSTIN ::
~ Auto Customer Details Fetch from GSTIN Website just by Entering Customer / Supplier GSTIN :
~ Check the Image Below :

~ Just Click on "Get Auto Party Detail by GST No."
~ Now type your Customer / Supplier GSTIN in the Box and Press Enter or Search Button. Wait for few seconds. All Details of Customer / Supplier Name, Address, GSTIN, Contact Person Name, PAN Card Number, City Name, State will be automatically Filled. Now remains is to select Account Group as required (Customers / Suppliers)
~ This is unique Feature in SuperERP Software and launched recently to ease the job of data entry & give accuracy to your data.
=====
# List of Account (Report) #

~ New : Press New Button to Create New Account. Follow the Instruction in Account Master to Enter the Data
~ Birthday : Will Show List with Filter of Upcoming Birthday & Anniversary of Customers, Suppliers & Other Lagers.
~ Export : Export Whole List into Excel Sheet
~ Import : Import your Customer / Supplier data from Excel Sheet into Software avoid typing into Software for initial setup process. The Sample Template sheet will be available by exporting same master to excel. Fill the data same way as in exported sheet. "Customer Group" Field need to be precise same name as in software available.
~ Labels : Customer Address Labels can be printed in bulk with this Button. Watch Whole video how can we do that. Even we can Customize the design of printed label with required size in crystal report software. the rpt file name is "Labels.rpt"

~ Search : Search is Important Filter Option to analyse the only data you required on screen. You can search with multiple filter conditions & fields you want to with Sort By Options available in Radio Buttons Below the Search Window.
~ Mobile App : A really Connected App With E Commerce. Customer's Can download this app & order the goods the same will show in software & Vendor can Generate invoice of the same & deliver the goods ordered. Watch Whole Video of this Process how it works live on You tube Here.

~ SMS : API Based SMS Portal. Can be Integrated with any API Bulk SMS Provider. We provide the same with Extra Charges. You can Send Bulk SMS to your Customers through this or Customized SMS Based on Data Filter Conditions. Here is the Link our Blog which will guide you about how it can be done.
~ Close : Quit / Close the Screen
~ Footer Area : Shows all Short cut Keyboard Keys to Execute Specific Task in your Account List Address Book. Eg.,
1:F3-Add New Account,
2:Alt+E-Export to Excel,
3:Alt+S-Search,
4:Alt+M-Send SMS,
5:Alt+I-Import from Excel,
6:F8-Show Lager of account selected
7:Esc-Quit/Close the Screen.
~ To Search Specific account just start typing that lager name, it will show that lager on page immediately.
~ Edit - By double Clicking that Lager will open the same in Edit Mode, Where you can Delete or Edit the data then Update the changes into Same.
~ Footer Sky Blue Area will Show General Information about that selected Lager Ex. Mo No, Bank Detail, Contact Person Name Etc...
=====
# List of States (GST Regime) #

~ To Search Specific State & State Code Used to Map GST Business Invoicing
~ Create New State if required in future with its State Code
~ State Code is Important Code associated with your GSTIN Number. From the mother State it gives prefix to your GSTIN Business Trading Number with Two Numbers. Starts from 01 to 37.
~ While making Invoice is Customer GSTIN Starts from same Prefix State Code than Software automatically makes sales invoice with B2B Local Sales Invoice with CGST & SGST Bifurcation.
~ If Customer GSTIN Prefix is different or from making sales invoice for customer from different state than software will automatically make sales invoice in IGST Format.
~ The same Tax bifurcation will be reflected in GSTR 1 & GSTR 3B forms generated in Software automatically.
# List of City & States Master #

~ Account Master of any customer or supplier needs details of City name of the same.
~ SuperERP Software gives this feature to link your customer City name to state, so that to minimize the time of data entry & giving accuracy while checking outstanding route wise or other MIS analysis.
~ Also GST Report of Sales will come accurate as no hassle to select state name once city name is selected, & mapped with State of the City or Village.
~ Edit, Delete or Create New Area Master from the Same Screen by double Click on record.
=====
# List of Area & City Master #

~ Customer Data Entry this fields will be asked to for entry.
~ Very Important field in data entry for Software Users who wants to manage their wholesale Business Trading into SuperERP Software.
~ As Wholesale Business needs to manage Invoicing Area wise (Route Wise), Delivery and even collection, Orders booking.
~ So major MIS analysis and reports requires AREA filter for all transactions.
~ Defining Area Master & Mapping it with City/Village Name will surely give you accurate data analysis with minimum time to search the Filtered Condition.
~ Edit, Delete or Create New Area Master from the Same Screen by double Click on record.
=====
# List of Account Group #

~ This is No of Record Masters Entry in Account Master Account Group wise.
~ Basically you will be able to fetch the Details in Single Click on this report that how many customers you have entered into SuperERP Software.
# Account Group Master #

~ Create New Account Group here
~ Edit or Delete existing Group here
~ You can not Delete or Edit Basic Account Groups
~ While Creating New Account You need to select Account Group which is compulsory
~ As SuperERP Software has Only one Account master to create any lager of Customer, Supplier, Bank or Expenses.
~ So its important to select proper Account Group for particular lager.
~ Ex. Your Customer account will have Account group as "Sundry Debtors" or "Customer"
~ Same way for Supplier & Expenses, Income, Loan Etc.,
~ Generally this knowledge is necessary to maintain accounting entries into software.
~ However if you are using SuperERP Software You don't need to worry much about it.
As we have automated this process. If you are creating New Lager from Sales Invoice the Account will take "Customers" as Account Group by default. same way if you create new lager from purchase screen "Supplier" will pop as a account group automatically.
~ Select Bank Account for Banks
~ Select "Expenses (Direct/Indirect)" for any other Expense making lager including Employee Leger whole we pay as salary.
=====
# Opening Balance Editor #

~ Opening Balance Edit Screen is used to Edit the Opening Balances of Lagers in Bulk.
~ Generally While making software "Year Closing" activity Closing Balance of particular lager of customer or supplier or Bank will automatically to next Year Company as Opening Balance.
~ Still we have this feature in our software that is very useful while making balance sheet of company at the time of Income Tax Return Process.
~ Even we ca use "Click here to automatically update from previous year closing balances" Button in footer area of the screen if we have done lot many changes into previous year accounts after finishing Year Closing Process.
~ However we recommend to edit opening balance figure into particular account into new year manually if there are only few edits in previous year accounting lager
~ Make sure that Debit Balance & Credit Balance of the Opening Balance Screen remains Equal to generate perfect Balance Sheet in End.
=====
# ITEM MASTER #

~ Item/Product Master
~ Service Master~ The Most Important Master Data Entry in SuperERP Software.
~ Lets Start Entering Product Data into Master Now
~ Click on "Items" Tab on Right Short Column or Press "Ctrl+I" to open the Screen
~ New : Click on New Button on List of Items Screen to Start New Item Entry
~ Item Name : Type your Product name here, or Service Name which will display in Invoice printed and available for search at the time of purchase or any other filters
~ Short Name : Type Any Code (Numeric or Alpha Numeric) Code of Product here which will be available while making sales / POS / purchase entry to find product fast & Speedy (This field can be made unique or Accepted as duplicate entries as per need of Filter during transaction)
~ Tax Slab : GST Tax Slab Selection for particular Product / Service as applicable. As per GST Regime in India the available GST Tax Slabs are : 0%, 5%, 12%, 18%, 28%. (3% for Jewellery & 18% for Services Billed)
~ An Automated CGST, SGST & IGST Bifurcation will be posted in software as per Sales / Purchase Invoice Entry made in State or Our State. You can check the Defined GST Bifurcation Figures in selected slab Master by clicking "pen" button beside. No need to edit the existing details without any proper knowledge, everything entered is commonly applied conditions as per Indian GST Regime Laws.
~ Item Company : If your product need a specific mapping of Brand of Product you can select here from list or create an new one by pressing "Plus" Button Beside or Edit Existing Company Record by Pressing "Pen" Button Beside. Select General if Not required to map any other data.
~ KEEP ON PRESSING ENTER KEY ON YOUR KEY BOARD TO ENTER THESE THESE DATA, WILL AUTOMATICALLY GUIDE YOU TO NEXT FIELD REQUIRED TO ENTER. JUMPING DIRECTLY THROUGH MOUSE FOR SPECIFIC SELECTION IS NOT RECOMMENDED AS FEW COMBO SELECTIONS ARE MANDATORY IN ITEM DATA ENTRY.
~ Item Group : Select "General" here. Create New or Edit if Requires for Proper MIS Analysis of your Business.
~ Primary Unit : Select the Unit of your Product from List. Ex. Pcs., Kg, Gram, Litre Etc as per requirement (Create or Edit Existing Data by Pressing "Plus/Pen" Button Beside)
=====
Multi Unit Settings (Alt Qty)
~ Alt. Qty : Check Box : Alternate Quantity : Single Layer Alternate Quantity Field : Skip this Field if Not Required. If you are using software for whole Business Management and your Product comes in Multiple packing Ex. 1 Box Containing 10 Nos of Products inside, than Such Multi Layer Inventory can be managed here. Just Tick mark on Check Box here & Selection Box pop will appear on the screen with Conversion factor of Box to Numbers of Product.

Same will be displayed while making sales / purchase entry with rate selection of Box or Nos. and Stock report will show the data consecutively in both the Units of Measurements of the same item.
~ HSN Code : Type Product HSN Code here. Harmonized System Network Code : Generally this Code Contains Digits 4 , 6 or 8. These Numbers are provided by govt. of India which ensures Commodity of Goods, Metals, Non Metals, Food Products, Cotton, Etc., according to that each Goods has been defined a specific HSN Code. You can avail these codes from google or they are already available on purchase invoice of your supplier. If you are creating some Service in SuperERP software than instead of HSN Code SAC Code-Service Accounting Code you have to Define. Click on this Link for HSN & SAC Code Details Blog.
~ Maintain Batch : Check Box : Skip this field if not required. If your Product needs details like Batch, Expiry, or Size for Garments than you have to Check this Box Right so that Batch Details window will pop up for data to enter if specific item.
~ Purchase Price : PTR - Purchase Rate of Item given by supplier need to enter here.
~ Sales Price : Rate which we need to sell the product is entered here.
~ MRP : Maximum Retail Price : MRP of Product can be typed here.
~ Automatic Sales Price Calculation Settings : You can Enter the Margin percentage & calculate your Sales Price automatically in SuperERP Software. This Feature is generally used in Ready made Garments Store Management Software.
# Settings : Software Menu : Tools > Options > Check Box 'Tick' on - "Margin Calculation"
~ Basic Price : Same as Purchase Price of Product, Still you can use this box if you have other values of product to be pop up during making sales invoice type here.
~ Mini. Sale Price : Minimum Sales Rate to be entered here which will pop up while making sales invoice so that better negotiation can be done during selling process.

~ Self Val. Price : Self Valuation Rate of Product (Type your value only if required multiple rates for same item while selling)
~ Minimum Stock : Value typed here will reflect into Stock report where you will be able to filter available stock below "Minimum Level" Defined here, can be different for each items.
~ Maximum Stock : Value Typed here can be filtered with Stock above Maximum Item Level Defined here, this value is generally used to avoid over budgeting of stock
~ Re-Order Stock : Value typed here will reflect in filter conditions in stock report so that we can re order sold items easily. ::: Stock Report Available at : Software Menu : Stock Report > Stock Report :: Use "Search" Filter :: Select option from available options "Critical Level Reporting"
~ Discount (%) : Value typed here will give discount automatically for particular item while making sales invoice.
~ Item Location : TYpe Rack No, Shelf No or Box No. of Items available in stock that will make easy to find specific item while making sales invoice for Customer. Item Location will pop up in sales invoice after selecting item in billing grid.
~ Barcode : Leave Blank this field, software will generate each product barcode automatically starts from "10001". Can be printed also with any type of label & details entered of Product. If you have Barcode ready on Product then just scan it here with use of barcode scanner, the barcode number of product will appear here immediately. That can be used while making sales invoice by scanning the same barcode.
~ Item Description : Type detail text here if your product have some extra details to print in invoice. (Max 250 Characters)
~ Op. Stock Qty : Opening Stock Quantity Numbers can be typed here if you want to start using SuperERP Software and you already have some stock available with. Rest coming stock will be updated by entering purchase invoice.
~ Op. Stock Value : "Op. Stock Qty X Purchase Price = Opening Stock Value" This Figure will pop up automatically, if you have entered Purchase Price Value & Op. Stock Numbers in Fields respectively.
~ Spc. Purchase Head : "Purchase" By Default Value - No need to change
~ Spc. Sale Head : "Sales" By Default Value - No need to change.
~ Image Box : Double Click on Image "No Photo Available" will open windows explorer to select your desired image to map with Product entered above. Recommended Image type is .JPEG format and size should be 50X50 Pixels to 100 X 100 Pixels of image
~ Save : Save the Entered Data.
~ Update : Edit the Item Data Entered & Press Update
~ Delete : Delete the Product data entered
~ List : Pop up List of Items Screen
~ Close : Close or Exit from Item Master Entry Screen.
How to Edit Items Prices in a bulk?

# LIST OF ITEMS #

This is Item Master Report
~ Header Buttons ~
~ New : Enter data of New Product
~ Export : Export total list of products entered into Excel
~ Import : Import Products List from Excel Sheet into Software
~ Barcode : Print Barcode Label of your Product
~ Settings : Product Settings : Ex. Batch, Size, & Additional Customized Fields can be created from here.
~ App : Android App - Associated with SuperERP Software, Allows customers to buy products & gives notification into software immediately up to invoice making of the same app order.
~ Items Bulk Price Editing available. Please check the Video Link.
# BARCODE PRINTING #
~ Item List Screen (ctrl + I)
~ Click on "Barcode"
=====
# OPENING STOCK EDITOR #

~ Bulk Opening Stock Edits can be done from this Screen
~ Software Menu > Master > Opening Stock Editor
~ Just start editing the "Op. Packs" Fields besides particular items which you want to edit the stock figure.
~ Now Press Enter Key to auto lock the given figure
~ Go on Editing the required items stock from the list on display.
~ Press Save Button on "Top Right" Corner.
~ You can Export to Excel the whole list by pressing "Excel" Button.
~ Apply filter on Top Text Boxes for the desired Company or Group Products
~ Auto Sorting of list available with customized settings to select from combo box selection available in "below Left" Corner of the Screen.
~ If you have done Year Closing Procedure and want to get Closing stock Figures of previous year Products into New Created Financial Year then Just "Click" on Text at top "Click here to Automatically Update From Previous Year Closing Balances"... the process may take time if you have big product list data. make sure that the previous year database path of company data is correct in > Master > "Company Info" > Check Previous Year Database Path Folder :
~ Make sure that you press "Save" Button in Last once finish the import of all figures from previous year data. Check the Below figure :

=====

~ Software Menu > Masters > Item Company
~ Just type the New Brand Name of your Product here
~ Press Save Button
~ Double Click to Edit / Delete the Existing record
~ Search in below text box if you have big list
~ You can always create a New Brand while entering Products from Item Master by Press "Plus" Key Besides Item Company Selection
~ Edit the Existing record by Pressing Pen Button Beside Company Selection Box in Item Master Screen
~ Press "Esc" or "Close-Red X Button" to Close the Screen.
=====
# ITEM GROUP (Category/Type) #

~ Software Menu > Masters > Item Group
~ Just type the New Group/Category Name of your Product here
~ Press Save Button
~ Double Click to Edit / Delete the Existing record
~ Search in below text box if you have big list
~ You can always create a New Group while entering Products from Item Master by Press "Plus" Key Besides Item Group Selection
~ Edit the Existing record by Pressing Pen Button Besides Item Group Selection Box in Item Master Screen
~ Press "Esc" or "Close-Red X Button" to Close the Screen.
=====
# OTHER CHARGES MASTER #

~ Software Menu >Masters > Bill Sundry
~ All Sales Invoice, Purchase Invoice, PO, Challan, CN or DN Screens there is a "TAB" name as "Other Charges" in bottom left of every entry screen.
~ This is important super flexible extra charges screen which master can be designed by us as we want to give effects in.
~ Government & other complex business needs it happens a lot time that new types of charges on invoice is lived and that needs to be created always otherwise invoice amount wont match as required.
~ All these types of flexible charges like Courier, Freight, Additional Yard Cess Etc., can be created from this screen.
~ Recently Indian GST Council announced a specific Cess Tax on Every Big Manufacturers Named "TCS TAX" - i.e. Tax Collected at Source. Such requirements can be easily full filled in our SuperERP Super Flexible & Customization Software from this Other Charges Master Screen Settings.
~ Let's Learn how to do that...
~ Ex. You want to Create "Freight Charge"
~ Charges Heading : Freight Charge, Press Enter
~ Print As : Same as Heading Name
~ Account Head to Post : Select from List or Create a new Account Head from Account Master
~ Types of Charges : Select from Radio Button Plus or Minus Effect of Charge in Invoice
~ Input Amount of Charges as : Select Input Type of charge as Absolute Amount, Percentage, on quantity or other
~ Apply on : type the figure if Percentage is selected, Type Calculate @ Figure and also Select on which Base Amount this Charge should Apply to from List given.
~ Tax Settings : Tick mark on Check box to calculate the GST tax, on Other Charge Head with Selection of Existing GST Tax Slabs.
~ Left Footer area of screen lists all charges available by default & newly created one.
~ You can Edit/Delete any existing Charge from List & Update.
=====
# SALT MASTER #

~ Additional Master for Items
~ Software Menu > Master > Salt
~ Above Screen for Salt Master will Open
~ Just type the New Extra Field Name of your Product here
~ Press Save Button
~ Double Click to Edit / Delete the Existing record
~ Search in below text box if you have big list
~ You can always create a New Data while entering Products from Item Master by Press "Enter Key" After Typing Item Name
~ Press "F3" to Create new Record During New Item Entry from Item Master Itself
~ Press "Esc" or "Close-Red X Button" to Close the Screen.
~~ Please Check Below Settings Screen Which will Guide you How to Enable this New Master Field and Give it any Name you want as per your Need, the Same Master data filter and MIS Reports available throughout software ~~
~ Check Below Image ~

~ How to Set New Master Field In Item Master?
~ Go to Items
~ Click on Settings
~ Tick Mark on "Require Salt" Check Box
~ Type the Name of New Master Field you want in Item Master in "Write Salt As"
~ Press Apply
~ Now Start Entering New Item data by Press "New" Button
~ Immediately after typing Item Name if you press "Enter" Key this New Master Field will pop up with available list to select. If you want to create a new record here just Press "F3" from your Keyboard.
~ After Selecting the data in Extra Field Master Press Enter Key, it will hide automatically.
~ to Re open the same or Edit the record in that, click on item name field & press Enter Key will reopen for editing.
=====
# UNIT MASTER #

~ Software Menu > Masters > Unit
~ Just type the Unit Name of your Product here Eg. Kg, Pcs, Dozen Etc.,
~ Select the Actual Unit Predefined Master Value of Same Unit from list
~ Press Save Button
~ Double Click to Edit / Delete the Existing record
~ Search in below text box if you have big list
~ You can always create a New Unit while entering Products from Item Master by Press "Plus" Key Besides Product Unit Selection
~ Edit the Existing record by Pressing Pen Button Besides Product Unit Selection Box in Product Master Screen
~ Press "Esc" or "Close-Red X Button" to Close the Screen.
~ You can Configure Alternate Quantity Unit Master too
~ Its Same Procedure as above to create Master. Than map it into specific item with conversion factor as shown in below Link v
=====
# MEMBERSHIP MASTER #

~ Software Menu > Masters > Membership
~ Create New Member by Pressing "New"
~ Membership No. : Comes automatically in numerical order
~ Card No. : Type of Scan (Barcode if available) your Card No Here
~ Select Person Gender Prefix
~ Name : Type Name of your Member
~ Address : Address of Member
~ City : City of Member
~ Mobile No. : Mobile No. of Member
~ Photo : Double Click on Image beside and Explore the Jpeg image from your PC Here
~ Date of Birth :
~ Date of Anniversary
~ Valid From Date : Comes Current date by Default (You can edit if you want to)
~ Valid up-to : Select Date you want
~ Spl. Discount (%) : Type Value Here
~ Press Save.
~ Edit or Delete Existing data from Member List Screen with Search filter available
~ Bulk SMS to Members from List Screen
~ Print Membership Card from List
~ Close or Esc to Exit from the Screen.
=====
# TAX SLAB(GST) MASTER #

~ Software Menu > Masters > Tax Slab
~ All GST Tax Slabs are Ready available here in list (0,5,12,18,28)
~ Create New GST Slab Ex. 3% for Jewelry from here
~ GST 40% for Cold drinks category products can be generated from here. Just Click on New, Type Name of your GST 40% Slab,
~ Select System : GST
~ Select Category : Goods/Services
~ Type in IGST as 28 & press Enter key will automatically pop up half value into CGST & SGST
~ Cess % : Type "12" for Cold Drinks Products Category, Else type the Requires Cess Percentage here as different values in different SIN Products Category
~ Select "ON" as "Taxable Amt' or "Tax Amount" as Required
~ Special Cess : Used in SIN Products Category
~ As per : Select from available options
1. Taxable Amt(%), 2. Basic Amt (%) 3. Main Qty Etc.. Few Other options available as per GST Council of India Defined "Special Cess" Category GST Slabs for SIN Products & others.
:: Apply GST as Per Range in POS ::
> Tools > Options > POS Settings > Tick on "Apply GST as Per Range in POS"
This feature will allow you to enter price range in GST Tax.
~ Price Range : From - To : This is Special Feature very useful in Ready made Garments. Where all Products Below 1000Rs. are treated as 5% GST & Above that will be counted as 12% GST.
~ Now in case if you have purchased Product in 999Rs. & Selling it at 1200Rs. than Same Product will have GST Tax while purchase as 5% but when it goes to Sales it should count as 12%. Also if you are applying some discount on same product while sales & effective price after discount goes below 1000Rs. if should take GST as 5%. For this reason this Price Range Master Value Box is given. You can type Here the desired Value.
~ "Calculate Tax on MRP" : Check Box : Tick Mark this option if required to calculate GST on Products MRP Always (Not required in normal cases)
~"Calculate Tax on Free Goods Also" :Check Box : Tick Mark this option, GST Council of India has already announced that even if you sell Product on Zero Sales Price as Free Goods the GST Tax Should be collected from Customer on that & paid to Customer.
~ To avoid paying this Tax, you can give discount to Product while Billing that is permitted and deducts the GST to be paid to Government, you can Enter Discount up to 99.99%.
~ Update & Delete Buttons are given to edit the existing or created data
~ Not Recommended to Edit existing GST Tax Slabs given in software already.
~ Press Esc or Close(Cross Button on Top) to exit from the screen.
*** Service Tax Category (SAC) ***

> GST Tax Slab Service Category Can be seperately Created As shown in Above Image.
> Items Created assigned to this Category won't Show in Stock Report.
> Items assigned this category is compulsory for all E Invoice Generators who uses SAC Category of Code for Billing Purpose. (SAC=Service & Accounting Code)
=====
# Cheque Book Master #

~ Generally this List Provides the data how many Cheque Books used during Financial Year
~ Gives Cheque No Data in Serial Nos.
~ Makes job easy to analyse how many cheque issued & how many leafs entered in master
=====
# STANDARD NARRATION #

~ Software Menu > Masters > Std. Narration
~ Every Entry Screen in SuperERP Software contains Field "Narration" i.e. Remarks we want to leave in any document. Lot many times it happens that we type the same data text in this remarks field. to avoid hassle to type repetitive data in to this field this master values are stored here. which will display as selection during respective entry screen as defined here.
~ Narration : Type the repetitive data here
~ Entry : Select the respective entry screen here
~ Save : Save the Narration. You can Save Multiple Text data lines here in same Entry screen and choose the right data while making that entry on actual.
~ Delete, Edit, Search Existing Data from same Screen
~ Press "Esc" Button to Close/Exit from the Master entry Screen.
~ Very Much useful field available with Search filter of same selected data in particular Entry Screen List Search Box.
=====
# PROCESS MASTER (BOM) #
BILL OF MATERIAL
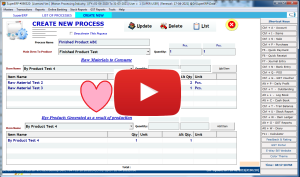
~ Software Menu > Masters > Process
(Click Here for How to activate this BOM Module)
~ Useful Master Usually known as "Bill of Material (BOM"
~ Defining BOM for any product which requires Repackaging or Production
~ BOM - Process Master will define list of Items requires to product the final or semi final Product as raw material entry and also same screen will allow to enter the product result as by Product during process of production of same
~ Let's First learn How to make BOM - Process
~ From Master List Screen Press "New" to start
~ Give your Process a "Name" (Generally same as Main Item Name to Product) to avoid confusion
~ Main Item to Produce : Select the Name of Product which is Final Product name saved already in Item Master previously, if not available in list, Press "F3" from your keyboard and create a new Finished Product First. Better to give separate Item Group Name as Finished Product"
~ if you are repackaging the product create the same here with same name of product with repacked weight. Eg. "Bhakharwadi 250Gm"
~ Quantity : Type Unit of Quantity here as a Batch (If not multiple units defined Both Qty fields will have same values
~ Raw Materials to Consume : Select Item Name from the List here, Press Enter
~ Quantity : Type the Quantity unit required to produce the Batch Quantity required of Final Product. Raw Materials stock will reduce as per quantity units entered here after we save the production of same Item.
~ By Products Generated as a result of production : Select the Item name from list here which is generated after the production process here.
~ Quantity : type the Quantity units as actual. This quantity will add into stock of item Name selected here after we save the Production Data immediately.
~ Save : Press Save Button to save the whole data of Process BOM
~ List : go to list of processes created, Search filter available
~ Edit : Double click on specific process from list to edit or delete
~ You can deactivate the process if required if delete not possible
~ Press "Esc or Red Cross Button" to exit from the screen.
:: Watch Video of whole Process how to do these entries ::
# PURCHASE / SALE TYPE #


~ Watch Whole Process Live on our You Tube Video Live Below

~ Software Menu > > Masters > Sale Type, Purchase Type
~ There is already "Sales" & "Purchase" Type added by default
~ SuperERP has all Function automatic which decided itself if Invoice is B2B or B2C or IGST, Depending on Which State of Customer/Supplier you select in Account Master.
~ Make Sure that when you create your Company, select your state & your GST State code Perfectly. Depending on that Software will decide the type of Sales or Purchase type automatically.
~ However in some cases you need to create different Sales Type / Purchase Type.
Eg. if you want different Sales Price to define for separate sales type or in case of purchase types some purchase invoice comes with inclusive Rates of Products where as some with Exclusive Rates with GST Tax. To avoid calculating the Product Net rate to type during purchase entry, you can just create two separate purchase types. Check below how to create new sale / purchase type.
~ Press New to Start
~ Voucher Title : Type "Sales or Purchase"
~ Account Head to Post : Select from List "Sales / Purchase" which is needed
~ LEFT PART : Select Taxation Part : Select any one Option with radio Button provided on left side panel
:: Meanings of Taxation Types ::
1. Tax Exclusive - GST Tax will be calculated on Sales / Purchase Price as add on and then Product Amount will display.
2. Tax Inclusive - GST Tax will be Calculated in Sales / Purchase price it self, one Rate pop up will open with default rate, after pressing Enter key, software will automatically reduce the Price of Product and Add Tax on that Price with final Amount appear same as original price added of Product.
Basically this feature will divide the Price of Product by (GST Tax Value + 100) & Generate its Rate as Product Price. Ex. if Product Price is Rs. 100 & 12% GST slab is selected, then its Inclusive Price will be 100/(100+12=112). i.e. 89.28 (with two digit Accuracy by default)
3. Tax Manual - GST Tax can be typed manually
4. Tax Charged Manually in other charges - from other charges Screen in Invoice as required. Automatic Tax won't be calculated from Items Master
5. Exempt - Tax Invoice with Exempted Products
6. From Unregistered Dealers (RCM) - Tax will not be counted in invoice. You can make entry of reverse charge too if required.
~ Select these options from radio button as required. You can't select multiple radio buttons in one Sale / Purchase type.
~ MIDDLE PART : Select Invoice Type : Select Option from List as Described. This Section is by default Tick Mark with "Fully Automatic Mode" - Software itself decides weather Invoice is Local, IGST, Tax or Retail Depending Upon State Selected in Customer / Supplier Account Master and GSTIN Entered or not.
~ If you remove this tick mark, than Invoice Type Selection will appear with Radio Button Eg. Tax Invoice, Retail Invoice.
~ Also Select Region Type as Local or Interstate, as required.
~ RIGHT PART : You can type Invoice No. Prefix as desired here and Jump Serial No. of Invoice starting. By default software starts Invoice Serial No from 1.
~ Invoice Heading : Type the Invoice Heading as desired in Sale Type Eg. TAX INVOICE, RETAIL INVOICE, SEZ INVOICE Etc.,
~ Pick Price By Default for Sale / Purchase Type. This Feature is Useful when you need different prices for different category customer. You can create new sale type with each having Sale Price, MRP, Basic Price as Reference which is available & can be Predefined in Item Master.
~ Created Sale / Purchase Types will be available at Entry Screen which you can select at each Entry time. Display list will pop up with alphabetical sorting order.
~ Edit / Delete : Press Search Button, Find the Required Sale / Purchase type from the list, Double click on it will show data on screen for editing. Press Update for Edit Save or Delete Button to Delete the Type Fully. Software will not allow you to delete the Sale / Purchase type if any entry transaction is made with same type. First you have to remove / delete that entry, to delete the existing main master.
~ Press Esc or Close Button to Exit from the Screen.
=====
# USER MASTER #
~ Software Menu > Masters > User
~ New : Create New User (Login into Software requires User Name & Password Compulsory)
~ User Name : Type the Name Required
~ Position : Select fro List "Super User" or "Operator"
~ You can Create New Position or Role of User from User Profile Master
~ Password : Type the Password Required. Screen will display **** by default for your actual data.
~ User Code : Type any No as user code if required
~ Press Save.
~ Edit / Delete : Double Click on specific User data from User List and make the necessary edits. Press Update or Delete as Required.
~ Press Esc or Close Button to Exit from the Screen.
Check You Tube Video Explaining Live
=====
# USER RIGHTS PROFILE #
~ Software Menu > Masters > User Profile
~ Define User Role & Activity Control from this Screen.
~ Click on List of Profile, Select the one you want to edit by double click or create a New User Role
~ Position Name : Type the Role of User here. Eg. "Operator"
~ Now Remove the Tick Mark of Screen which you don't want to Allow to User to operate in SuperERP Software.
~ Each Master & Entry Screen is Listed Here. Eg. Account, Item, Sales, Purchase Etc.,
~ Each Screen has Mainly : Add : Modify : Delete : View : Print Rights to Check.
~ Tick Mark as required. Eg. if you want to allow your user to make invoice but you don't want him to Modify the invoice once saved than remove the tick mark from "Modify" From "Sales" Screen. This will remove the "Update" Button from Sales Invoice Making Screen, thus even if User tries to manipulate sales invoice after saving, he/she won't be able to update that Change.
~ Few Options to remove Menu Options for Access to User are listed on right Panel of the same screen. ~ Tick Mark the Check Box as required.
~ Even you can Lock the Sales Rate Editing during making sales invoice option available
~ Press Update Button to Save the Edits made or Delete to remove the User Role Profile completely.
~ Press Esc or Close Button to Exit from the screen.
:: Even after defining Full User Rights if Owner wants to Check User activity of Edits & Delete or some other required data, everything is Store at Timeline Report available in Help Menu of Software. Which can't be Deleted by User.
=====
# COMPANY (GST Firm) MASTER #
~ Software Menu > Masters > Company Info
~ Last Menu of Masters in SuperERP Software.
~ When User Creates a New Company into SuperERP Software, All the details about his/her GST Firm is entered initially.
~ Still if you want to edit any details like change in Phone Number or Address can be done from this Master Screen.
~ Company Name : Your GST Firm Name as should printed on Invoice
~ Address : Type the Address here. Make Sure that if you have long address characters, advised to use 2nd Text Box for extended address details. Typing more data than text box available length will give error while printing your sales invoice.
~ City : type the name of city
~ Pin Code : City PIN Code.
~ State / Province : Select the State Name from List pop after writing few characters and Press Enter Key. That should pop up State Code Automatically which is defined in SuperERP Software as per GST Norms of Govt. of India by GST Council.
~ Country : Select the country you want to operate from
~ Mobile : Type your 10 Characters Mobile Number Here, without any country prefix or Zero. If you have more than one Number separate them by "," comma without keeping space in between. This is needed because software sends SMS to Owner of Log Billing Details daily on same Number.
~ Phone : Type any Broadband Number / Land Line Office Number you have & want to display on Sales Invoice Printing.
~ E mail ID : Type your mail ID Here.
~ E mail Password : Only Enter the Real Mail Password here if you want to send your customers your sales Invoice E mail Automatically from this Software.
~ Auto Mail of Sales Invoice will work from here with few conditions & settings.
1. Settings in your G Mail : "Less Secure Apps" Make this "ON" in Your G mail Account settings will allow our software to access your mail box. You can get this Link directly if you click on "Right_ABC" Logo Beside E mail Password Text Box.
2. if you have already activated Two Step Verification, Than "Less Secure Apps" Won't open in you g mail Settings.
~ Website : Type only if required
~ GST No. : Most Important Part of your company info. Make Sure that it is Correct in 15 Characters.
GSTIN has Specific Construction carries your State Code as Prefix precedes with your PAN Number and last three characters defines GST regimes.

~ PAN No. : if not registered for GSTIN you can start with your PAN Number here
~ VAT No. : Value Added Tax : (Old Taxation System)
~ CST No. : Central Sales Tax Number (Required if Old VAT Invoice has to be done)
~ DL No. 1 & 2 : Drug License Numbers : Required in Products Billing like Medicine, Food Etc., Needs to be printed on sales invoice compulsory if your business falls into this category.
~ Our Bank : Enter data here only if you want to display your Bank Details on your Sales Invoice Print. Press ctrl+Enter Key for entering 2nd Line Data. Use Max 3 Lines which accommodates the standard invoice format templates easily.
~ Basically we need 1. Bank Name, 2. Branch, 3. Ac No. & 4. IFSC Code (Indian Financial system Code) of your Bank printed on cheque book of your account.
~ E-Way Bill Login Details : Type your User Name & Password here received while GSTIN Registration. Not Compulsory Skip if not required.
~ Previous Year Database Path : Comes automatically shows data folder of previous year company data. Displays only afer we do Year Closing activity in our Company after 31st March to carry forward Inventory & Accounts Data to New Financial Year.
~ Apply : Press this Button if you want to update the details you have entered
~ "Esc" or "Close" to Exit from the screen
~ You can create such Multiple Companies in same SuperERP Software anytime you want
~ All details entered here will be automatically print in all your software generated documents like sales invoice, Credit note, Debit note, quotation, purchase order, Payment Receipt etc.,
=====
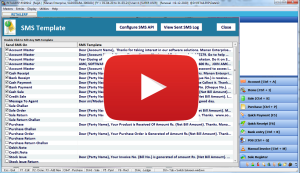
# SMS Template Master #
~ Software Menu > Help > SMS Templates
~ Account Master : Double Click on Text Box Beside Account Master, Type the data you want to set as template, You can Double Click on "Variable Fields" shown beside your Text Editing Box, Eg. Account Name is your Customer Name. Press Save Button. Make sure that the Characters are below 150 to get charged of only one SMS Charge.
~ SuperERP Software has very dynamic Auto Bulk SMS integrated portal which works with any API
~ Configure SMS API : Allows you to map your API String in Part 1, Part 2, Part 3 provided by any bulk SMS provider.

~ We do have in house Bulk SMS API Portal ready to use.
~ Type the Mobile Number for daily Business Summary while log off software.
~ Tick mark on right Check Box if you want automatic summary, for multiple Mobile numbers, separate the Numbers by "," Comma sign and don't keep any space in between. only 10 digit mobile nos. without any country prefix or Zero.
:: Automatize your Transactions ::
~ Every Entry Transaction Screen has its Customized SMS format to set in this screen.
~ Sales, Purchase, Payment, Receipt, Quotation, POS, CN, DN, POS Sales & all others.
~ Payment Outstanding SMS can be made from Outstanding screen with one Click, this screen gives you area selection for whom you want to send SMS that will contain Outstanding amount & Customer name automatically.
~ Call Recorder Screen has SMS Customization for intimation to Customer for Pending or Postpone of Job Time, Inquiry, Service Call intimations & Mapping it with Sales / Service person with SMS intimation.
~ SMS Log Report : available on top of the screen weather your sent SMS has been delivered or giving some error for wrong API mapping.
==========
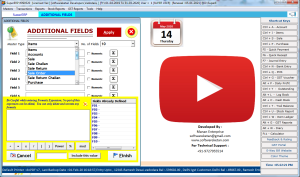
# Additional Field Master #

~ Software Menu > Tools > Additional Field
~ Open the Screen
~ Click on Field Type - Select the Master or Entry Screen where you want to add additional fields
~ Max limit "10 Fields" to create additional input boxes
~ Master Screen we have Items & Account to add for additional fields.
~ Every Entry transaction screen Ex. Sales, Purchase, PO etc., have extra fields to create & name it here.
~ We can have search filter available of these extra fields in Advanced search sales, Purchase report
~ In Item Master even we can have calculation fields as we want with desired mathematics formula to add in as shown in above image. watch video for more details how to do it.
==========
# Offer Master #

~ Software Menu > Tools > Rate Settings
~ SuperERP Software has 5 types of auto discounts & Offer settings available which you can configure as & when required.
1. Group wise / Company wise
2. Party wise / Company wise
3. Party wise / Item wise Rates & Discount
4. Qty Based Rate & Discount
5. Weekly Company wise Discount
~ Let's Check all Screen one by one
:: 1. Group wise / Company wise ::
~ Press New
~ Select the group name from available list : This list contains customer & Supplier Groups which we have created in Account Group Master.
~ After we select a specific group, by press "Enter Key" all Company / Brand list will appear in list below the box.
~ This list is what we have mapped for all products while entering Item Master Data - Company Master.
~ Now Type the Discount you want to offer to your customer's specific group for their Cash & Credit Invoice. Type your Figure in Box for all brand you want to set.
~ Press "Save" Button
~ Edit the list of saved master from available list as required anytime from same screen or even you can delete the whole setting by pressing "Delete" Key on top right.
~ Even you can copy paste the same settings with little edits for other group of customers created by click on "Copy" button on top right corner of the screen.
~ if you have created lot many auto settings, search filter is provided in same screen on right bottom corner.
~ Press "Esc" or "Close" to close the screen.
:: 2. Party wise / Company wise ::
~ Repeat the same procedure above to customize discounts for specific customer instead of Customer Group.
:: 3. Party wise Item wise Rate & Discount ::
~ Screen Provides much Detailed Offer Settings.
~ Click on New to select specific Customer Name - Press Enter
~ Now Select Specific Product Brand / Company from the List available - Press Enter
~ All Products with associated Brand / Company will be displayed in the list Below
~ Just press Enter Key on Specif Item "Special Rate" to Enter
~ or type the discount you want to set
~ go on pressing Enter key will allow you to scroll the products list & set the Special rate for specific Item for specific customer.
~ Press Save : Copy : Delete : as required on top right.
~ You can Import & Export this list into excel easily by click on bottom text guides given.
~ Press "Esc" or "Close" to exit from the screen.
:: 4. Qty Based Rate & Discount ::
~ Press New to Start
~ Select Specific Customer Name from list or leave it with "All Parties" default Selection
~ Select Specific Item Name from List pop up - Press Enter Key
~ Select the Quantity Selection Basis : "Upto" or "Above" - Press Enter Key
~ Qty : Type the Quantity required.
~ Rate : Type the specific rate of item required if billing quantity is above specific Number or
~ Just Set the Discount / Offer Percentage Separate for Cash & Credit Invoices
~ Press Save : Copy : Delete : as required on top right.
~ Edit the list of saved master from available list as required anytime from same screen or even you can delete the whole setting by pressing "Delete" Key on top right.
~ Even you can copy paste the same settings with little edits for other group of customers created by click on "Copy" button on top right corner of the screen.
~ if you have created lot many auto settings, search filter is provided in same screen on right bottom corner for both Party/Customer & Item/Product.
~ Press "Esc" or "Close" to close the screen.
:: 5. Weekly Company wise Discount ::
~ Press New to Start
~ Select any weekday from the list available
~ Set Discount figure by pressing enter key into any Brand you want to for Cash / Credit Invoices
~ Press Save : Copy : Delete : as required on top right.
~ Edit the list of saved master from available list as required anytime from same screen or even you can delete the whole setting by pressing "Delete" Key on top right.
~ Even you can copy paste the same settings with little edits for other group of customers created by click on "Copy" button on top right corner of the screen.
~ if you have created lot many auto settings, search filter is provided in same screen on right bottom corner for both Party/Customer & Item/Product.
~ Press "Esc" or "Close" to close the screen.
==========
# Report Builder Tool. #
Customized Printing Format Mapping Screen
~ Software Menu > Tools > Report Builder Tool

~ Title of Report : Give any name to your report template you want to
~ Apply On : Select any screen from the list available you want to apply the new report
~ Check Box "Show this By Default" - Tick Mark if Required - Useful when multiple print profiles are mapped for specific transaction screen
~ Browse RPT : Explore the the Software Source Folder "SuperERP", Click on specific rpt file Press OK. will return to same screen.
~ Save : Press Save Button to add new profile into list.
~~ Selected all Print Profiles for particular Entry Screen will display as a list to select at the time of printing any document. You can make any one profile as "Default" to avoid selection cursor movement frequently.

~ Watch Whole Process Live on our You Tube Video Live Below
~ Edit / Delete : Double click on existing list to edit or press Delete Button in Bottom Left if required.
~ Search your Print Profile from list by title, Screen Name etc from filter available on bottom of the screen.
~ Press "Esc" or Cross Button on top Right to Exit the Screen.
~ All Software Transaction Screen rpt files should be kept in Software Source Folder "SuperERP"
~ All Barcode design Label rpt files to be kept in "SuperERP > Report" Folder.
~ You can design your own rpt file & Label in our software with help of Crystal Report.
~ SuperERP Print Profiles supports almost all types of Printers
~ Ex. Laser Printer, Ink Tank Color Printer, Dot Matrix Printer Etc.,
~ Set any color of text as desired & even set or select your page style Ex. A4 Paper, A5 Paper, Thermal Roll, Tractor Roll Etc., as required.
==========
# Import / Export Tool #
~ Master for Excel Import Template Designer
~ Export any report into Excel
~ Import from Excel : Items, Customer & Supplier List
~ Import Sales Invoice from Purchase Excel File
~ Import Bulk Receipt data from Excel
~ Export GSTR 1, GSTR 3B
==========
# Tools of SuperERP #
~ Report Builder Tool (Printing Master)
~ Reminders
~ Scheduler
~ Call Recorder : Service Module
~ Replacement
~ Other Reports
~ Default Bill Sundry Setting
~ Additional Fields (Master Creation Tool)
~ Discount Setting
~ Sale / Purchase Account Setting
~ Rate Setting (Offer & Scheme)
~ Excel Import Template Designer
~ Auto Expenses Voucher
~ Multi Company Reports
~ My Bill Format
~ Options (General Settings)
~ System Settings
~ Transfer Entries to another Company
~ Import / Export Data
~ Voucher Numbering (Custom Prefix)
~ Diary
~ Features / Nature of Business
~ Reset Financial Year
~ Calculator
==========
# Other Important Modules #
~ SMS Templates
~ Freeze Data
~ My Online Order Management
~ Timeline – Log Report
~ Merge Accounts
~ Rewrite Books of Account
~ Self Diagnostic Tool for Account
==========
# Software Help Modules #
~ ARC License Renewal
~ License Info
~ Developers Corner
~ Customized Report Manager
~ Send Feedback
~ Remove Null
~ About
